Importing CVEs
The Common Vulnerabilities and Exposures (CVE) List is a public reference of known cybersecurity vulnerabilities. This list, available from cve.org, continually changes as new vulnerabilities are detected. If your organization uses the CVE list, it can be difficult to determine exactly which patches you need to deploy to protect your machines from the threats identified in the list.
Fortunately, Security Controls simplifies this process. You simply import a list of CVEs from a text file that has typically been produced by your vulnerability scanner. Security Controls will automatically extract the CVEs, determine which patches are related to each CVE and then display those patches for your review. You select which patches to add to a patch group and then use that patch group in your scans and deployments.
You can initiate the import process three different ways:
- Select Import > CVEs
- On the home page, click the Import CVEs into a patch group link
- While creating or editing a Windows patch group
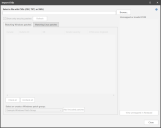
You use the Import CVEs dialog to complete the process.
|
Field |
Description |
|---|---|
|
Select a file with CVEs |
Use the Browse button to locate the file that contains the list of CVEs. The file can be in any valid text file format such as .csv, .txt, .xml, etc. The CVEs will be automatically extracted and the related patches populated in the Matching Windows patches and Matching Linux patches tabs. |
|
Show only security patches |
If enabled, shows only security bulletin-related patches. All other patch types are ignored. |
|
Refresh |
If you modify the CVE file after it has been initially processed, you can force a refresh by clicking this button. If the file is large, the refresh process (which consists of extracting the CVEs and determining the related patches) may take a few minutes to complete. |
|
Matching Windows patches / Matching Linux patches |
These two tabs contain all valid CVEs that were detected during the extraction process and that are mapped to at least one Windows or Linux patch. By default, all of the patches populated in these two panes will be marked as Include. If you want to exclude one or more patches prior to adding them to a patch group, clear their respective check boxes. |
|
Invalid or unmapped CVEs |
This pane contains all invalid or unmapped CVEs that were detected during the extraction process. A CVE may be invalid due to an incorrect name. A CVE is considered unmapped if there are no known patches related to the CVE. If you want to export this list to a text file to use as a reference for further investigation, click View unmapped in Notepad. |
|
Check all / Uncheck all |
Use these two buttons to enable and clear all the check boxes on the selected tab. |
|
Select or create a patch group |
Use this box to specify a patch group that will be used to contain the selected Windows or Linux patches. You can choose an existing patch group or type the name of a new patch group. |
|
Add included patches |
When you click this button, all patches marked as Include in the selected Windows or Linux tab will be added to the specified patch group. To view the new or updated patch group:
|
